
Lesson 11: Introduction to Radiosondes and Networks
Overview of the content
This lesson will cover:
- Radiosonde fundamentals
- Global and regional radiosonde networks
- Radiosonde data visulization
- Checklists prior to launch
Learning objectives
After completing this lesson, you will:
- Understand fundamentals about radiosonde, including
- the components of a radiosonde system and its measurements,
- the variety of radiosonde networks and data display (Skew-T diagram)
- Be familiar with the checklists prior to launch
Introduction
 Sounding
Sounding is the determination of one or several upper-air meteorological variables by means of instruments carried aloft by balloon, aircraft, kite, glider, rocket, and so on.
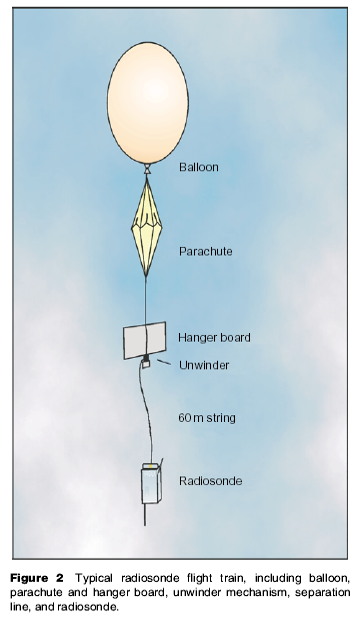
Radiosonde
As described by the National Weather Service, a radiosonde is a small instrument package that is suspended below a balloon filled with either hydrogen or helium
The goal of a radiosonde is:
- To make accurate measurements of important atmospheric parameters (usually temperature, pressure, humidity and wind) above the surface
- To send this information back in as close to real-time as possible
Learning resources
- This presentation by Dr. June Wang offers an overview of Radiosonde Basic Research and Development [download from Google Drive - newly uploaded 4/7/23]
- This overview from the National Weather Service will also be helpful
Checklists
Initialization checklist:Start check 30 minutes prior to launch
[download this as a PDF (same content as listed below)]
- Check batteries and change/charge if below 50% - ICOM/GSU/Computer/
- Ground Station turned on and connected before starting GRAW program
- Connect sonde for initialization
- Open the GRAW program
- Go to Settings (top left corner of screen – notebook icon)
- Program Settings > Communications Tab
- Detect both COM Ports and Receiver
- Exit out of settings
- Click Sounding/Simulation (do not use the wizard – it is good to troubleshoot with this if the sonde will not initialize)
- Click Initialize radiosonde
- Set sonde and ground station to proper frequency
- Enter ground values recorded on data form by Lufft position
- Double check frequency and ground values are correct
- Click start sounding
- Enter lat/long and altitude (both lat and long require negative sign in Chile)
- Confirm raw data is coming in
- Turn sonde to on position
- Unplug radiosonde from computer and deliver to acclimation table
- Double check raw data is still coming in
- Run balloon fill prediction with current ground values (balloon = 600g; payload = 100g)
- Help with fill while sonde acclimates
- Get sonde to attach to balloon.
- Launch balloon
- Confirm software detected launch (if it doesn’t within 30 seconds launch manually)
Saving Conventions:
|
Profile Data: W#_L#_LaunchTimeUTC_mmddyy_computer_Profile Raw Data: W#_L#_LaunchTimeUTC_mmddyy_computer_Raw SkewT: W#_L#_LaunchTimeUTC_mmddyy_SkewT BUFR: W#_L#_LaunchTimeUTC_mmddyy_computer_BUFR GSF: Leave as default name Overview Form: W#_L#_LaunchTimeUTC_mmddyy_Overview
Latitude_____________ Longitude_____________ Altitude_____________ |
Primary fill checklist: Begin 10 minutes prior to flight
[download this as a PDF (same content as listed below)]
- Check regulator attachment to helium tank
- Wait for OK to fill from person initializing and DGAC
- Note beginning psi level of helium tank
- Have initializer yell out fill value
- If tank will need to be changed during fill have 2nd tank next to 1st
- Get gloves
- Get balloon from box
- Attach helium nozzle to balloon neck
- Fill balloon (clockwise is open)
- Tap pressure gauge occasionally to get accurate level
- Remove nozzle from neck of balloon (don’t let go of balloon!)
- Allow secondary fill to attach sonde with zip tie
- Fold neck of balloon over and hold neck for duct tape
- Yell for verification of data from initializer
- Count down and launch
- Organize fill area and prep for next launch (remove empty tanks, throw away any garbage, replace tools to proper locations)
Secondary Fill Checklist: Begin fill 10 minutes prior to flight
[download this as a PDF (same content as listed below)]
- Set out zip ties and 2x 1.5’ pieces of duct tape
- Have wire clippers in pocket
- Get gloves
- Wait for OK to fill from person initializing
- Unroll balloon
- If tank is changed mid-fill – Use all of 1st tank and note amount needed from 2nd tank then move regulator to 2nd tank
- Yell for radiosonde (primary initializer brings to fill)
- Attach zip-tie and radiosonde loop tightly to neck of balloon
- Clip extra end of zip-tie
- Cover zip-tie with one piece of duct tape
- Duct tape thoroughly over folded balloon neck
- Double check dereeler is not tangled
- Make sure no strings from sonde are tangled
- Count down and launch
- Organize fill area and prep for next launch (remove empty tanks, throw away any garbage, replace tools to proper locations)
Video content
How Your National Weather Service Launches Balloons -- NOAA National Weather Service Albany, NY [YouTube video, 3:26]
- This video generally describes how the NOAA National Weather Service launches a weather balloon from its forecast office in Albany.
Readings / articles
The NOAA office provides more information on sounding analysis at https://www.spc.noaa.gov/exper/soundings/help/index.html
Additional resources also available on their Jetstream Online Education page: https://www.weather.gov/jetstream/radiosondes
![]() Don't forget to track today's progress in your portfolio
Don't forget to track today's progress in your portfolio
Will you take a few minutes to give us some feedback on this lesson? Thank you!
Course home page // Next lesson >>